Of all the household chores, vacuuming ranks up there as one of the least pleasant. It’s time-consuming, it’s boring, and it’s repetitive. But, a best robot vacuum can finally make the drudgery of vacuuming a lot more tolerable.
Robot vacuums rely on robotics and artificial intelligence to autonomously clean your home. They vacuum, sweep, and mop—all without the user having to do any lifting, moving, or pushing.
While they’re convenient and useful, they’re also prone to wear and tear. And just like with any other type of vacuum, they need maintenance to keep them running smoothly.
Here’s how to clean and maintain a robot vacuum so that it keeps running well for years to come.
Cleaning and Maintenance of Robot Vacuum Cleaners
There are many parts to take care of in a robot vacuum. Here are some tips for cleaning and maintaining each part thoroughly.
1. Cleaning Robot Vacuum Sensors
Sensors are the eyes of a robot vacuum that helps the machine navigate the space and avoid bumping on to the obstacles and falling from the stairs. Unfortunately, when the vacuum is used regularly, it makes sensors dirty and dusty, which causes disruptions in navigation and cleaning when the vacuum is operating. So, it’s time to clean the sensors of your robotic vacuum.
All the models come with instruction manuals on how to clean the sensors. It is advised to go through it and then take appropriate measures to clean the sensors.
In order to clean the sensors, it is best to use a soft microfiber cloth to wipe off all the dust and dirt from them. For stubborn spots, you can use a dampened microfiber cloth dipped in soapy water and then wipe it off. It is recommended not to use glass cleaners, bleach, or any abrasive cleaners as they may cause damage to the sensors.
2. Cleaning Robot Vacuum’s Wheels
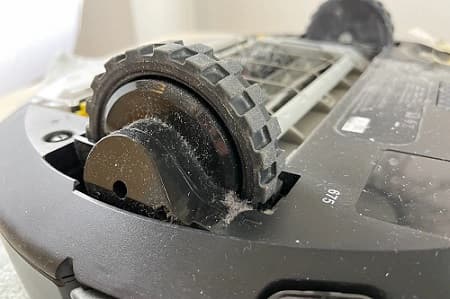
The clean wheels allow easy maneuvering of the unit across the house floors. If you feel that your robot is not moving freely, indeed the wheels are dirty, that is abstracting its movement. It may be due to the hair stuck on the wheels or any other debris.
Most of the models come with removable wheels that you can easily detach from the unit and clean any debris or pet hair stuck in the wheel’s axle. Make sure to wipe it off with a damp cloth before fixing it back to the unit.
In case the machine’s wheel is not removable, you can use a soft brush or utility knife to remove long hair, strings, and fibres wrapped around the wheels. But, never use water to clean the wheels as it may cause damage to the internal components of the unit. Clean wheels get better adhesion and reduce strain on the motor.
3. Cleaning Roller Brush
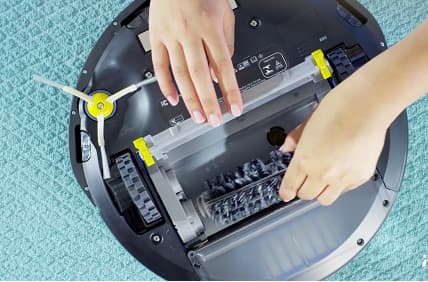
The roller brushes gather dirt, debris, pet hair, and lints and pull them into the vacuum’s dustbin. Like the wheels, roller brushes can also get clogged by hair, strings, and other debris, affecting the vacuum’s cleaning efficiency. So, cleaning of the roller brush is also very important because it can block airflow and weakens the suction power of the vacuum.
To clean the roller brush, remove it from the unit and cut away the hair, strings, and other debris wrapped around it using a knife or scissor. You should be extremely careful not to cut the roller brush bristles while doing this. Once most of the hair is cut loose, you will be able to tear the rest out by your hand or a soft brush.
Afterward, you can wash it in warm soapy water (Do check the instruction manual for doing this). Rinse it, and dry it completely before putting it back into the vacuum.
4. Cleaning Side Brushes
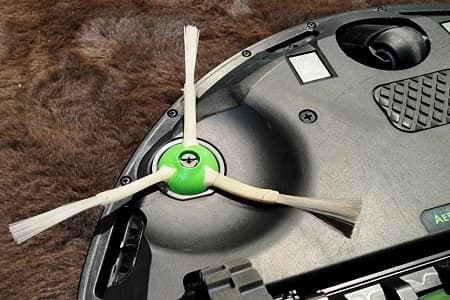
Side brushes of the robot vacuum also require cleaning from time to time.
The side brushes in a robot vacuum work as the helper of the main roller brush that pulls out the dirt and debris where the main brush can’t reach. Using the robot vacuum regularly can cause hair and strings to get wrapped around the side brushes, preventing them from spinning. So, they are not able to clean the corners and crevices properly.
To clean them, remove the brushes from the unit and pull the hair and fibres out of it using a soft brush or comb, then swap them back into the unit.
Sometimes, you may also experience that the brush is bent out of its shape, which will also affect its cleaning performance. You can straighten it by heating the bristles using a blow dryer for just a few minutes. If there are two side brushes, some manufacturers recommend to swap their location to help keep the bristles from bending too far in one direction.
If these methods don’t work, consider replacing them with the newer ones to get the cleaning job done perfectly.
5. Cleaning Filters
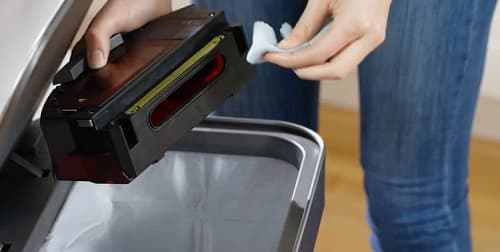
Air filters are the important components of a vacuum that require cleaning and maintenance on a regular basis to maintain the effectiveness and cleaning efficiency of the vacuum. You can clean them typically once a week or after every use, depending on how frequently you are using your vacuum or what’s being picked up.
To clean the filter, remove it from the machine and give it a hard tap on the side to clear all the dirt and debris from it. Further, use a soft brush to clean additional particles from it.
Since air filters are made of different components, wet cleaning of them should be done accordingly. Many filters are made from paper that you should never expose to water. They should be replaced right away if they get wet. On the other hand, plastic or foam filters are generally washable for easy clean-up. But make sure to dry them thoroughly before installing them back.
6. Cleaning Dirt Compartment
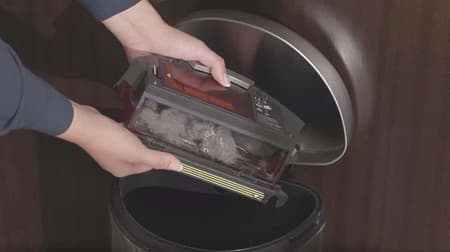
A filled dirt compartment reduces the suction power and the cleaning efficiency of the robot vacuum. So, it must be emptied after every use. Even if you have a pet at your home, it is better to empty the bin in the middle of the cleaning session as pet hair quickly fills the bin.
Dirt bins of a robot vacuum are washable too, in case it has sucked any gross stuff like kid’s or pet’s vomit, poop, etc. (Check the instruction manual beforehand and make sure to remove the filters away). Reinstall it only once it is fully dried.
The best part is that there are many smart robot vacuums with self-emptying feature. The automatic dirt disposal feature of the robovac allows them to automatically empty themselves into a larger dustbin present in their charging dock. The best part is that you don’t need to clean the dustbin so often, as it has the capacity to manage weeks of dirt (in most models, up to 60 cycles) without needing to be dumped on your end.
7. Upgrading Firmware and Software
The software and firmware upgradation is very important to improve the features and functionality of your robot vacuum.
If a new version of the software is available, a Wi-Fi connected robot will automatically update its software when it’s connected to your Wi-Fi network or the internet, and is on its Home Base. It allows the device to run smoothly, get new features and improve its performance.
Similarly, the upgradation of firmware may fix some bugs and release it with some improvements.
However, keep these important points in your mind while updating the firmware or software of your robot vacuum:
- Power on the device and ensure that it has enough power or is docked to the charging base.
- Make sure that you have a stable Wi-fi connection while doing this.
- Keep your phone, vacuum, and router close to each other while updating.
- Don’t turn off the vacuum in between the upgradation process.
- Use the device only after it’s been updated.
Read Next: How to Clean and Maintain a Regular Vacuum Cleaner?